Tutorial videos showcase your knowledge and expand your reach online. But creating them can be frustrating and time-consuming, with complex (and expensive) equipment setups, multiple takes, and hours of editing before you get the look you want.
With Vocal Video, you don’t need to be a professional to create a tutorial video that shares your insights in a highly engaging format. In this step-by-step guide, we’ll show you how to…
- Gather the equipment you need for your tutorial. With our tool, you can make professional, shareable video tutorials without an expensive camera, microphone, or editing software.
- Plan your video by breaking down the areas you want to cover and adding them to our video tutorial template as prompts to make recording and re-recording a breeze.
- Film your video with the camera on your phone, computer, or tablet.
- Edit your video with Vocal Video’s unique automatic editing process and a suite of drag-and-drop tools to take care of your video, audio, subtitling, overlays, and more.
- Publish and share your video online in as little as one click.
Throughout, we’ll look at examples from real Vocal Video customers, and share tips, tricks, and strategies to increase the return on the time and resources you invest in your video tutorials.
Businesses use Vocal Video to create content for everything from learning and development, product marketing, recruiting. To create video tutorials, get started now with our tried-and-tested Tutorial Videos template.
How to Make a Video Tutorial in 5 Steps
Tutorial videos are a valuable resource for your business. They can be used internally for training and onboarding or externally to help your customers reap the full benefits of using your product. Creating and sharing tutorials also helps you build your reputation and establish yourself as an expert in your industry.
Let’s break down the process of making and sharing a new video tutorial.
Step 1: Gather Your Software and Equipment
Start laying the foundations of your tutorial video by asking yourself how you want the finished video to look and how you’ll create this effect.
For example, if you want to film a hands-on demo, you’ll need to do more to prepare your space than if you wanted to share a screen recording with a voiceover. And if you're going to use animations or annotations in your video, you’ll need an additional set of tools or a professional to help you out.
Once you have an idea of your requirements, you can move on to setting up your space.
There are multiple options here, depending on your budget and the tools you already have on hand.
- If you have a lot of resources to invest in the video, you could spend it on studio time, hiring a professional film crew and equipment, and booking a video editor to join the team after the recording is complete.
This setup should give you a high-quality video that looks polished across your channels. The downside is the time (film crews and editors can be booked months in advance), the expense (we spent $25k on a single video before we founded Vocal Video), and the responsibility of acting as project manager.
- If you have a smaller budget but some space to play with, you could think like a content creator and set up your own recording space. You might invest in a camera, tripod, basic lighting, microphone, etc. You can also get familiar with video editing software like DaVinci Resolve, Adobe Premiere Pro, or Final Cut.
The advantage here is that you can create a decent home studio in quite a small space, and you’ll have creative control. The downside is the time it takes — not just in recording each take of the video, but in comparing equipment, learning new software, and stitching your video together at the end.
If neither of these options seems like a good fit, we have an alternative to offer.
Even if you’ve never made a video tutorial before, you can save money, save time, and bypass all the stress of the video production process. Use Vocal Video, along with the equipment you already have, to create a clear and easy-to-follow tutorial video that spreads the word about what your brand has to offer.
For example, Beacon Funding use Vocal Video to make warm and informative educational videos to share with potential customers.
Let’s look at how you can get results like this for your company.
Step 2: Plan Your Video
Tutorial videos need to be easy to follow, so your job is to find the clearest possible way to guide your viewer through the process you’re explaining. When you plan your video before the camera starts rolling, you’ll be able to create logically ordered instructions that answer all the questions your viewer has.
During the planning stage, ask yourself…
- What prior knowledge does your target audience have? Differentiating between beginner and expert-level tutorials will help you plan an informative, engaging, and empowering tutorial.
- How will you explain or demonstrate the process? If you know when the viewer will watch you speak vs. when they’ll watch the process in real-time, you’ll be able to decide everything from the order of the scenes to the way you set up your recording space.
- What do you want the viewer to do next? A call to action (CTA) at the end of the video could tell the viewer where to discover further resources, who to reach out to if they have questions, or point them toward more tutorials to learn from.
Once you know the information you want to convey, set yourself up to make a high-quality tutorial with a Vocal Video collector template.
We recommend adding a prompt for each stage of your tutorial video to the Video Tutorial Template, included with all Vocal Video plans.
The collector will take you through all the steps you want to cover and keep you on track as you create a concise and informative tutorial. Plus, when you break the process into collector prompts, you can re-record each section until you’re happy, instead of collecting countless takes or starting the entire recording from scratch if you make a mistake.
Whether you’re making training videos, explainer videos, or recording video instructions, the clearest how-to-videos have a similar layout…
- A brief intro, where you explain what you’ll cover, how long it will take to complete the instructions, and what experience level someone would need to complete the tutorial successfully. In the Tutorial Videos Template, this is covered by the prompt “Quickly describe the feature.”
- Detailed instructions that break down the process into concise, logically ordered steps. In the template above, the speaker is invited to “Record a short tutorial.”
- A conclusion that includes a call to action. The template covers this in the final prompt, “Connect the dots — what should the customer do next?”
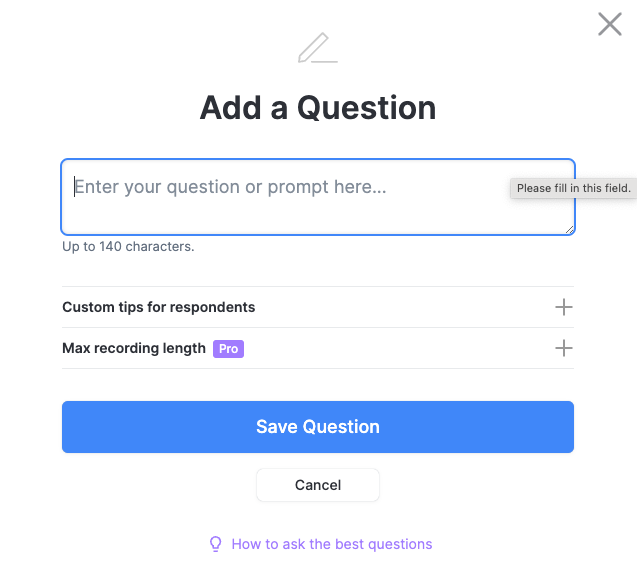
And, if you want to add additional questions to break the process into more steps, just open your new recorder, click “+ Add a Question,” and enter your question or prompt.
Step 3: Record the Video
Vocal Video tutorials are recorded with the camera on your smartphone, computer, or tablet. With the equipment you already have, you can create a great recording by…
- Choosing a quiet spot where you can avoid background noise or interference.
- Sitting in front of a neutral background so the viewer’s attention isn’t diverted by, for example, the titles on your bookshelves.
- Ensuring you’re not lit from behind, which can create shadows and lower the quality of the final footage.
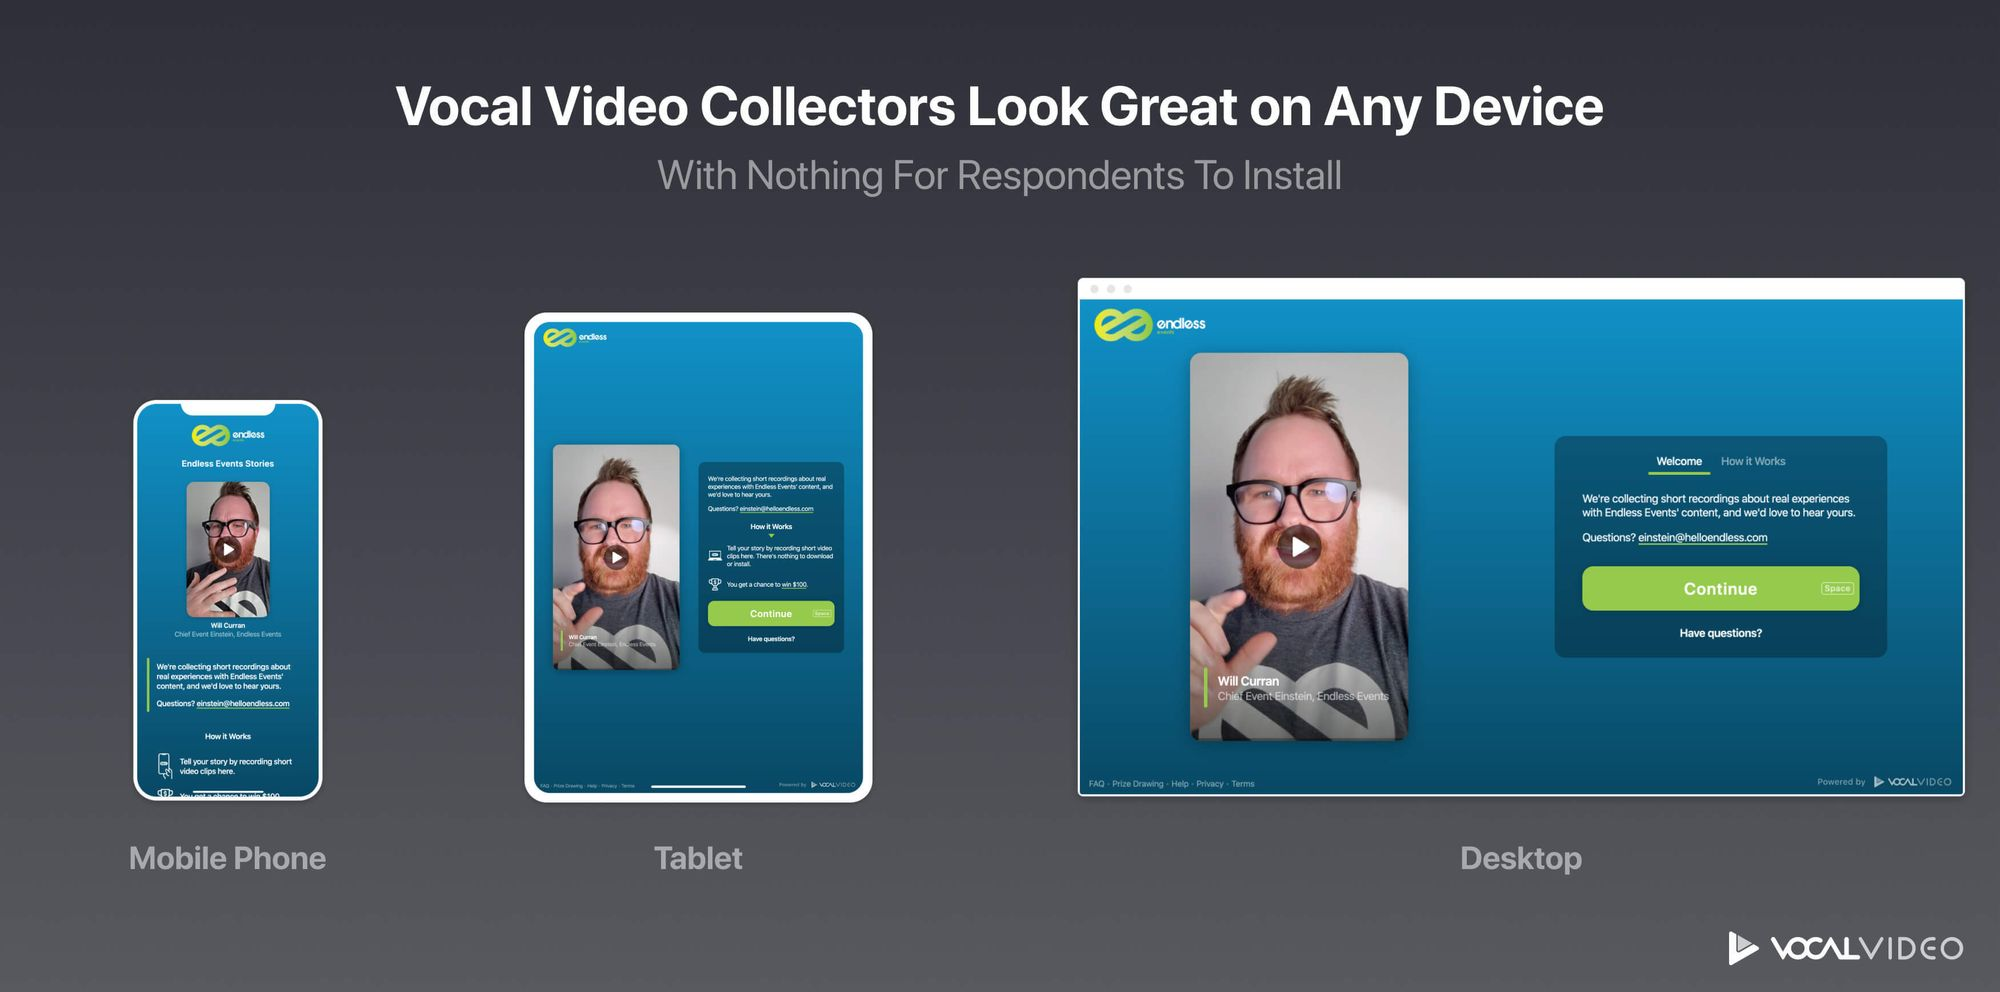
Then, it’s as simple as opening the link to the tutorial video collector to start recording. The video creation process can take as little as 5-10 minutes from beginning to end, and you can re-record your response until you’re happy with the final result.
In business contexts, tutorial videos often include screen recordings to show someone how to complete the steps or to present, for example, PowerPoint slides. If this is the case, you’ll also need an app to record your screen and download the footage.
Popular screen recording software options include Loom, Camtasia, and ScreenPal.
Tips for a Great Screen Capture
- Tidy up your computer screen before you start, minimizing the windows you won’t need and closing unnecessary tabs on your browser.
- Practice the moves you’ll make with your cursor (especially if you’ll be speaking at the same time) so you don’t distract the learners by moving around too much or making mistakes.
- Look for a high-quality screen recorder. The best tools will let you pause the recording and edit the finished clip on the same platform to save yourself an additional step later.
Step 4: Edit the Video
Beginners are often intimidated by the idea of editing their own video tutorials.
There’s the perception that you’ll have to juggle dozens of files with different takes, examine your video frame-by-frame, and go to the trouble of separating and rematching your video and audio files to get a professional-looking result. Plus, editing software interfaces with multiple parallel channels and endless tools can make the process seem completely inaccessible, while the truth is that these tools offer far more functionality than you need to make a successful tutorial.
That’s why Vocal Video takes the editing process off your plate. Our automatic editing feature means every tutorial you record lands in your library as a full video that’s ready to share with your audience.
As we’re processing your video, we stitch together the responses to each question and add:
- Opening and closing slides with your company’s logo and brand colors.
- Attribution information to identify the speaker and give your tutorial credibility.
- Dynamic transitions between the different scenes in the video.
- Subtitles to make it even easier for the viewer to understand the instructions.
- Upbeat music from our library of free-to-use tracks.
We also include a suite of intuitive editing tools on all Vocal Video pricing plans.
Whether you want to tweak the length of the video before you publish it or add additional graphics and recordings, these tools will create the look you’re going for with a fraction of the effort of other video editing tools.
For tutorial videos, it’s especially helpful to…
- Add additional text slides to break up the tutorial with written instructions or calls to action.
- Upload additional video clips from your library. If you have a screen recording or a demonstration to share, or if you have access to sophisticated recording equipment at your company and you want to use that footage, this is the way to go.
- Change the format of your video to be square, portrait, or landscape, depending on the platform where you want to share your video.
- Adjust your company logo or brand colors.
- Choose a new video theme to instantly change the feel of the tutorial with new music, transitions, font, and graphics.
These tools take video editing from a painstaking, frame-by-frame process to a job you can accomplish in minutes with slider and drag-and-drop tools. Put simply, if you’re looking for a user-friendly tutorial video maker that covers the process from end to end, Vocal Video is hard to beat.
Step 5: Publish the Video
When you’re ready to share your video with your audience, click “Publish” to create the public Vocal Video page where your video will be hosted. This page includes your company’s branding. If you include the subtitles in your video, we’ll add the full transcript to the page, too.
It’s easy to share your video tutorial with your customers or colleagues by sending them the URL to the public page. Once your video is live, you can click “Share” to…
- Email the video to your team or your clients.
- Share the video on social media, including one-click sharing to LinkedIn and Facebook.
- Download the video as an MP4 file for a YouTube video, or share it as a Reel.
- Generate the embed code you’d need to add the video seamlessly to your website.
For example, Vocal Video customers InvaroSoft embed a gallery of video tutorials and explainers to help customers make decisions about the products they use.
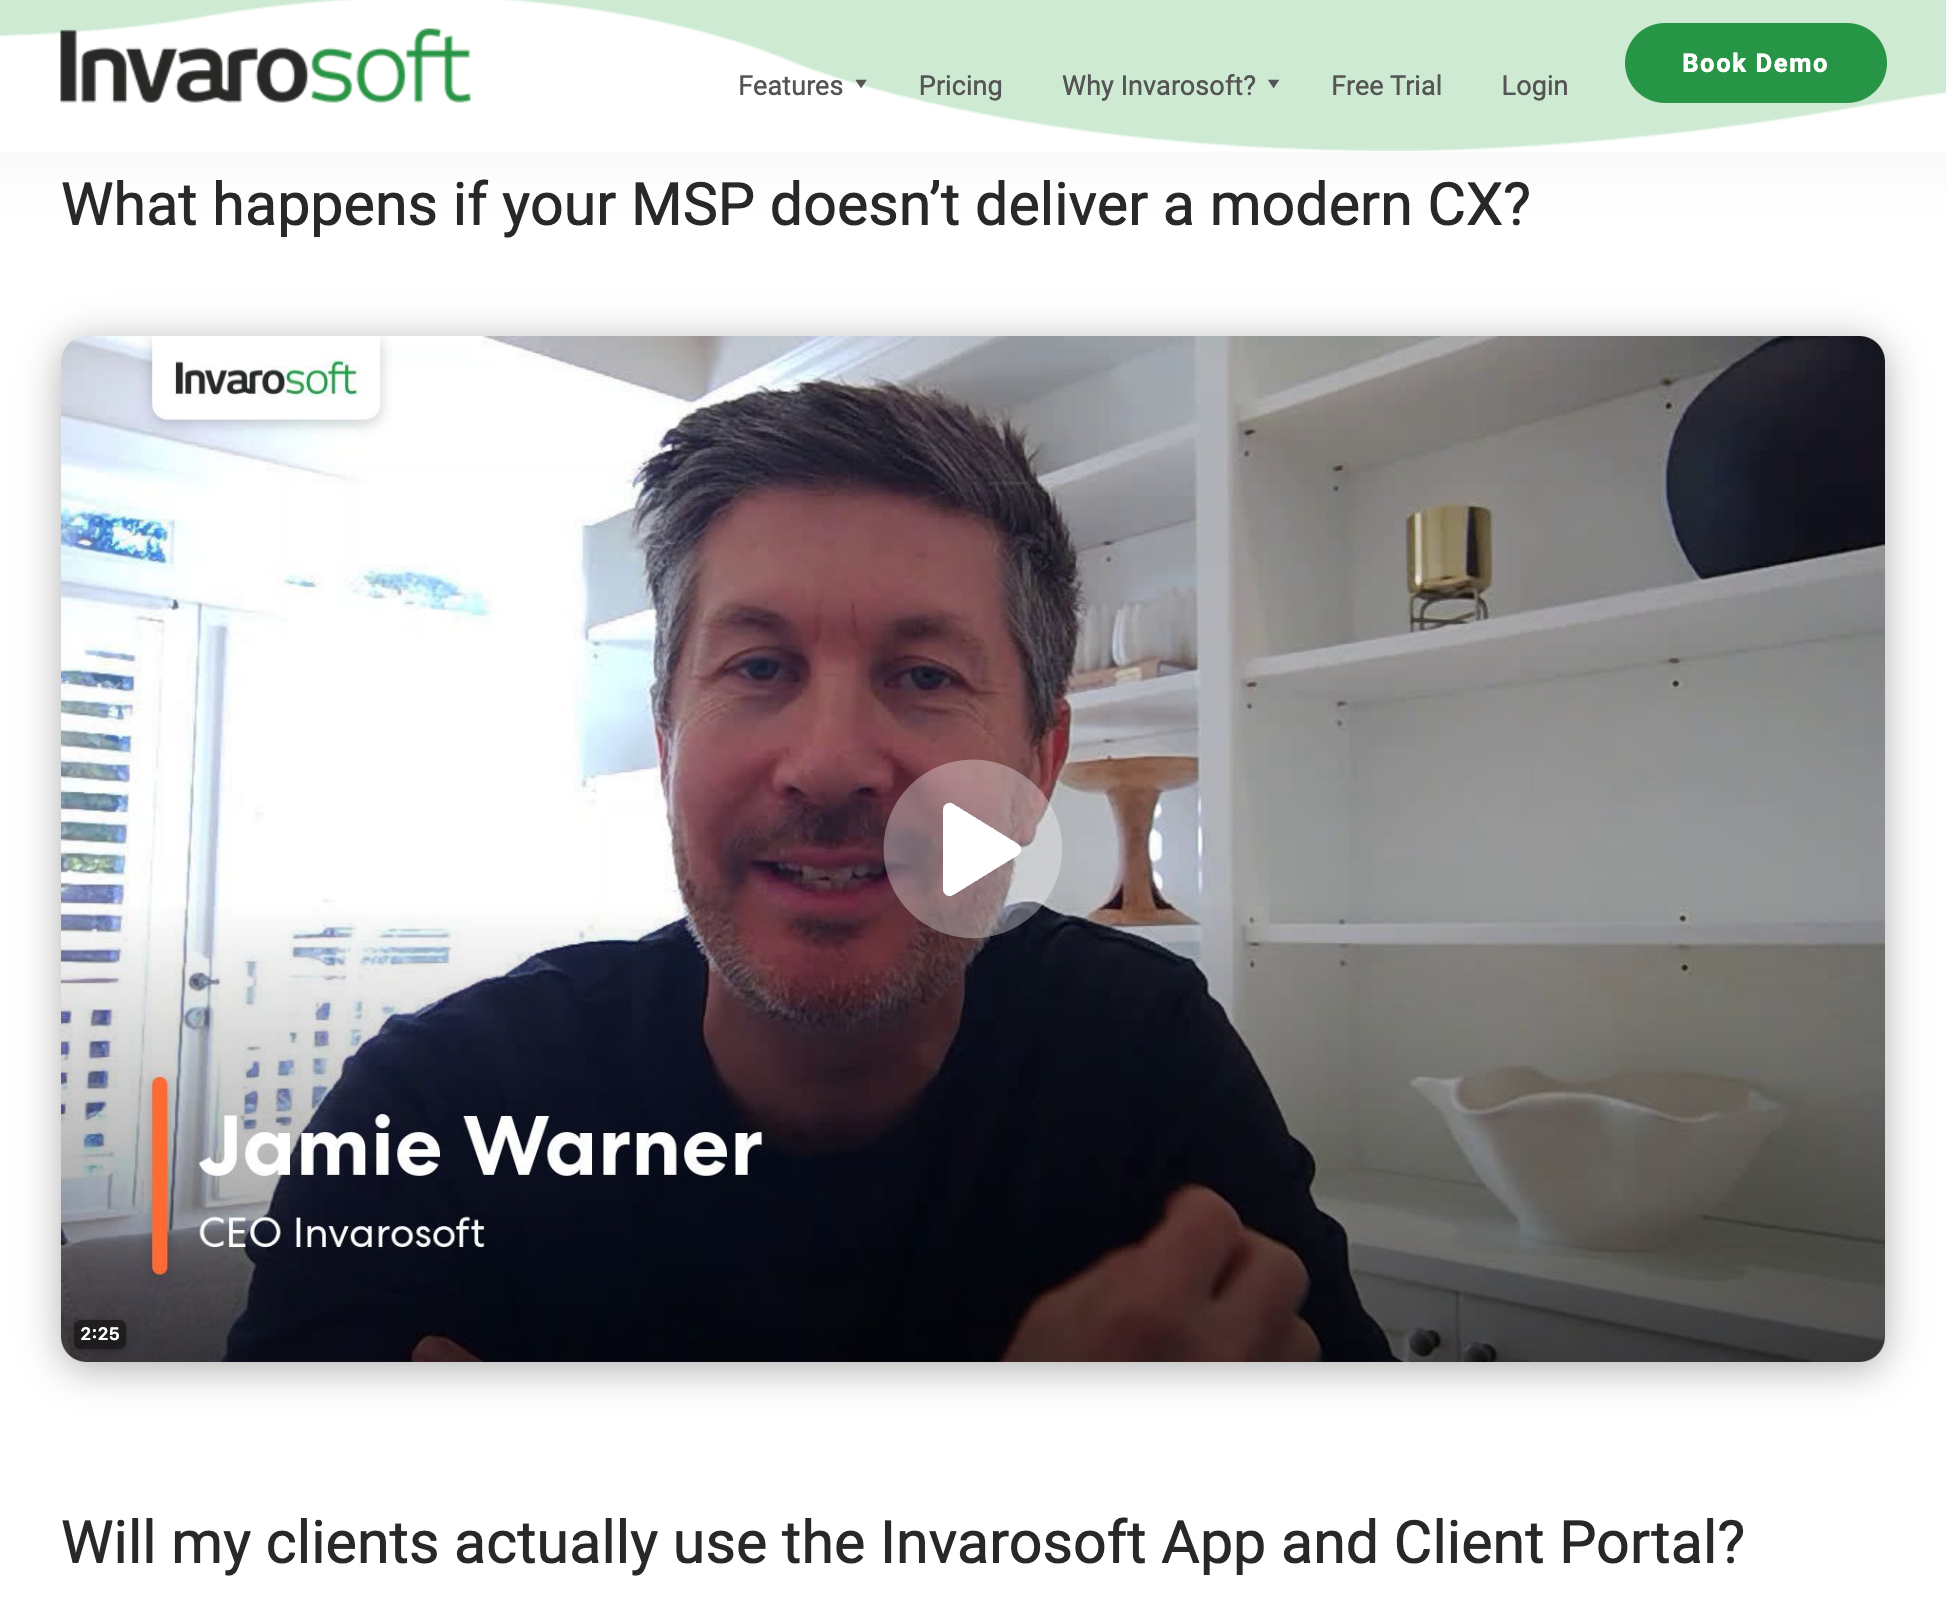
InvaroSoft’s method is an effective way to supplement an FAQ section on your website. The video format lets people pause and rewatch the content until they’ve truly grasped it, and watching someone explain the process creates an authentic connection that you can’t build with written instructions alone.
Find out how to build a gallery of video responses, with interactive examples, here: Video Galleries Overview.
3 Compelling Tutorial Video Examples
It’s one thing to explain how to make a good tutorial video, and another to see it in action. Here are three fantastic examples of video tutorials created by our customers.
1. Possip: Screen-Capture Tutorial Videos with Engaging Graphics
Possip helps schools and school districts access feedback from their stakeholders, staff, and students. They use Vocal Video for onboarding and for tutorial and Q&A videos in the spotlight section of their site.
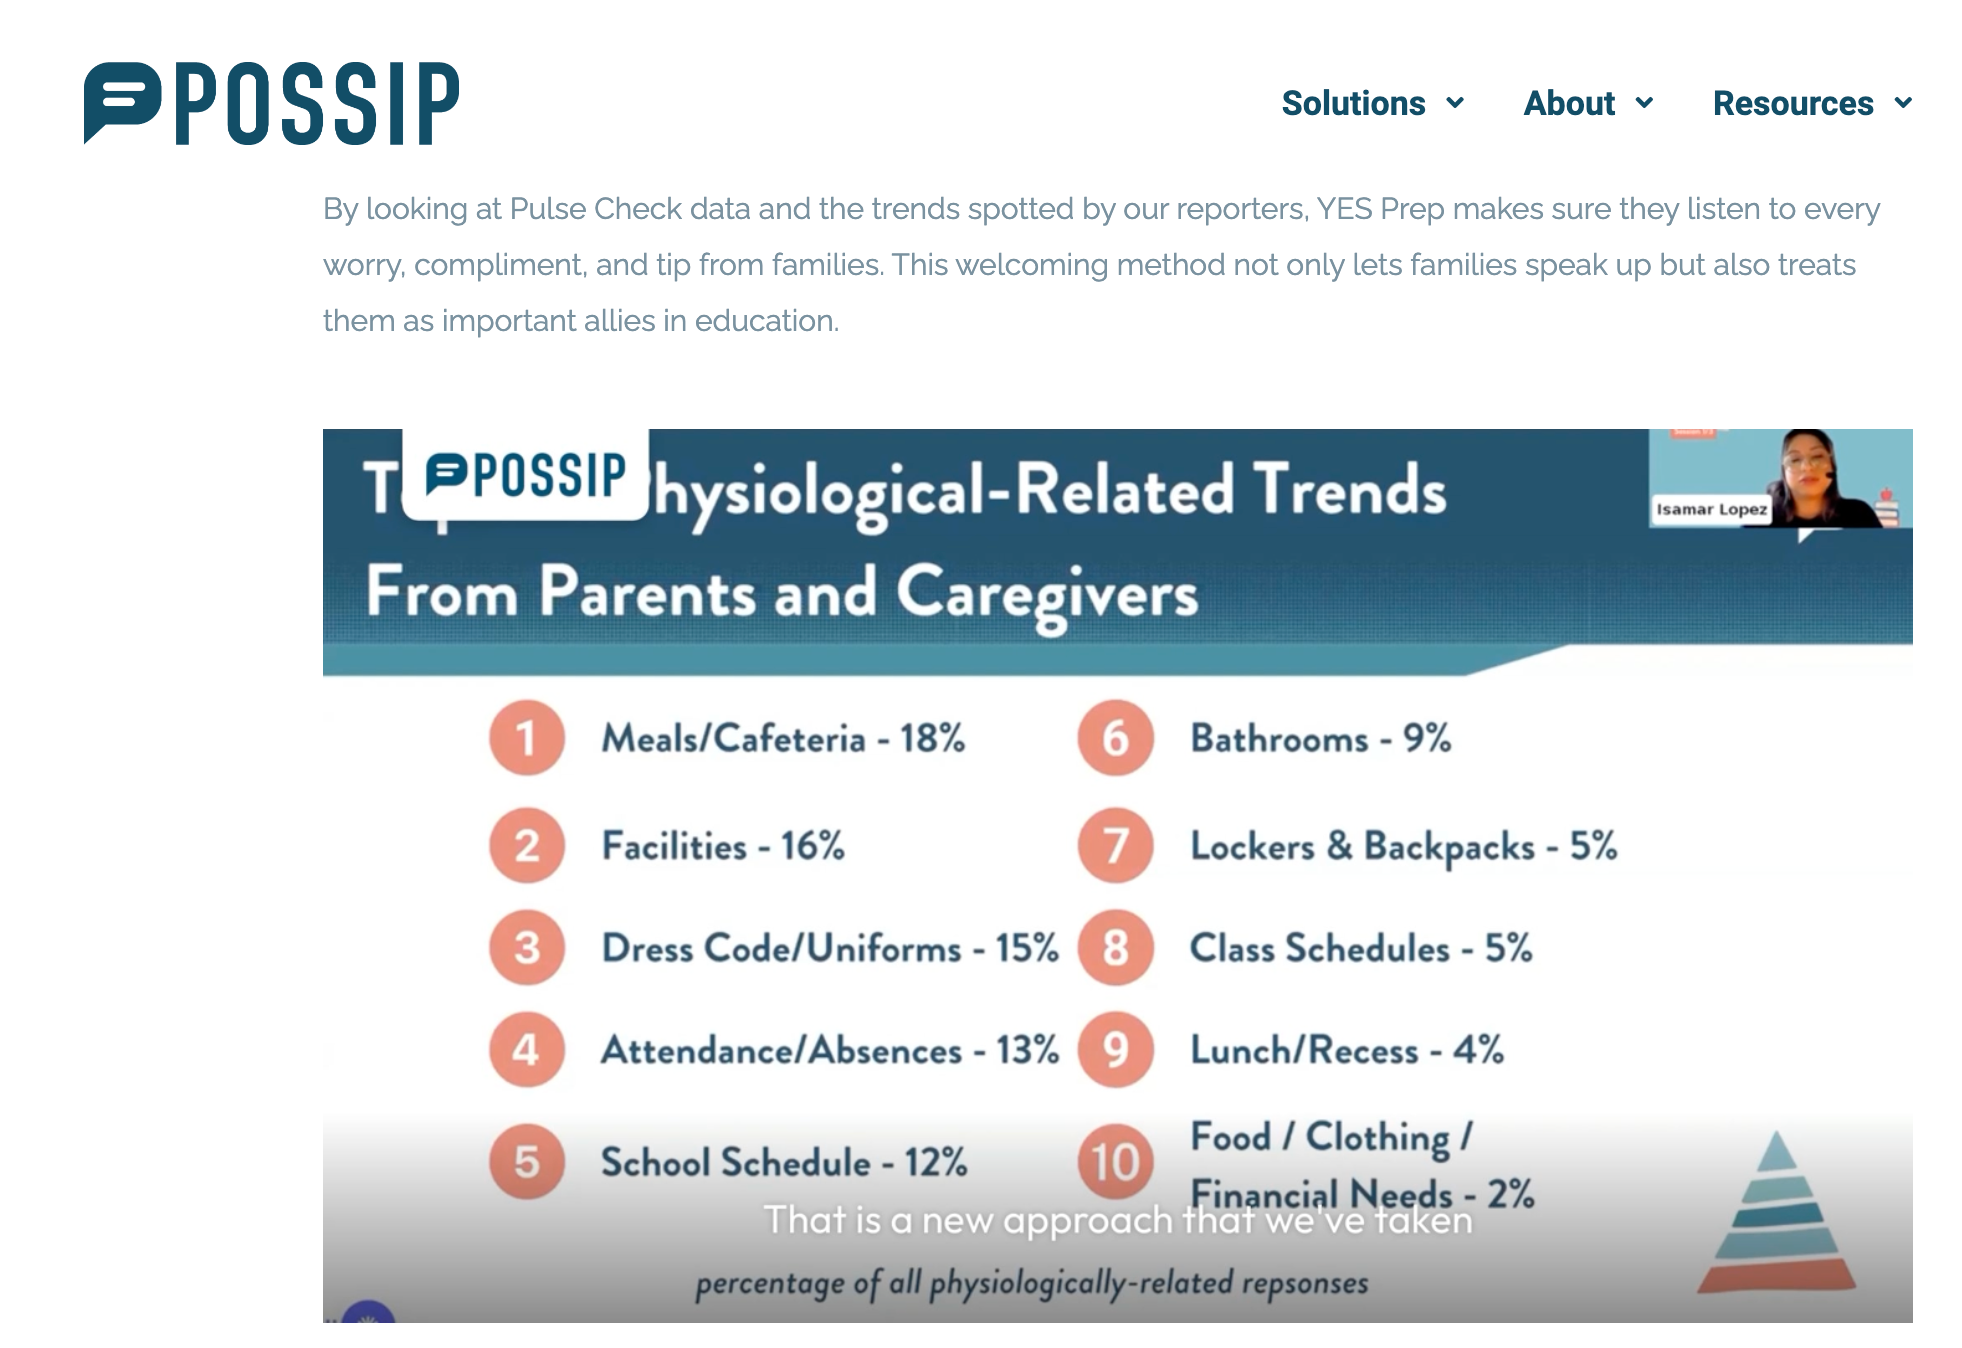
This video tutorial is easy to watch and engage with because the viewers can follow the statistics in the slide as they listen to the speaker explain them in more detail. The written content supplements what the speaker is saying, and the clear subtitles, automatically generated by Vocal Video, help the reader to follow and digest the information.
Plus, the branding on the opening slide perfectly matches the company colors in the other design elements, creating a video that makes a memorable and professional impression.
You can watch Possip’s full sequence of tutorials and Q&A videos here.
2. Agency 73: Tutorial Sessions for Potential Clients
Agency 73 is a Salesforce consulting partner using Vocal Video in recruitment and to create tutorials to use in their marketing strategy.
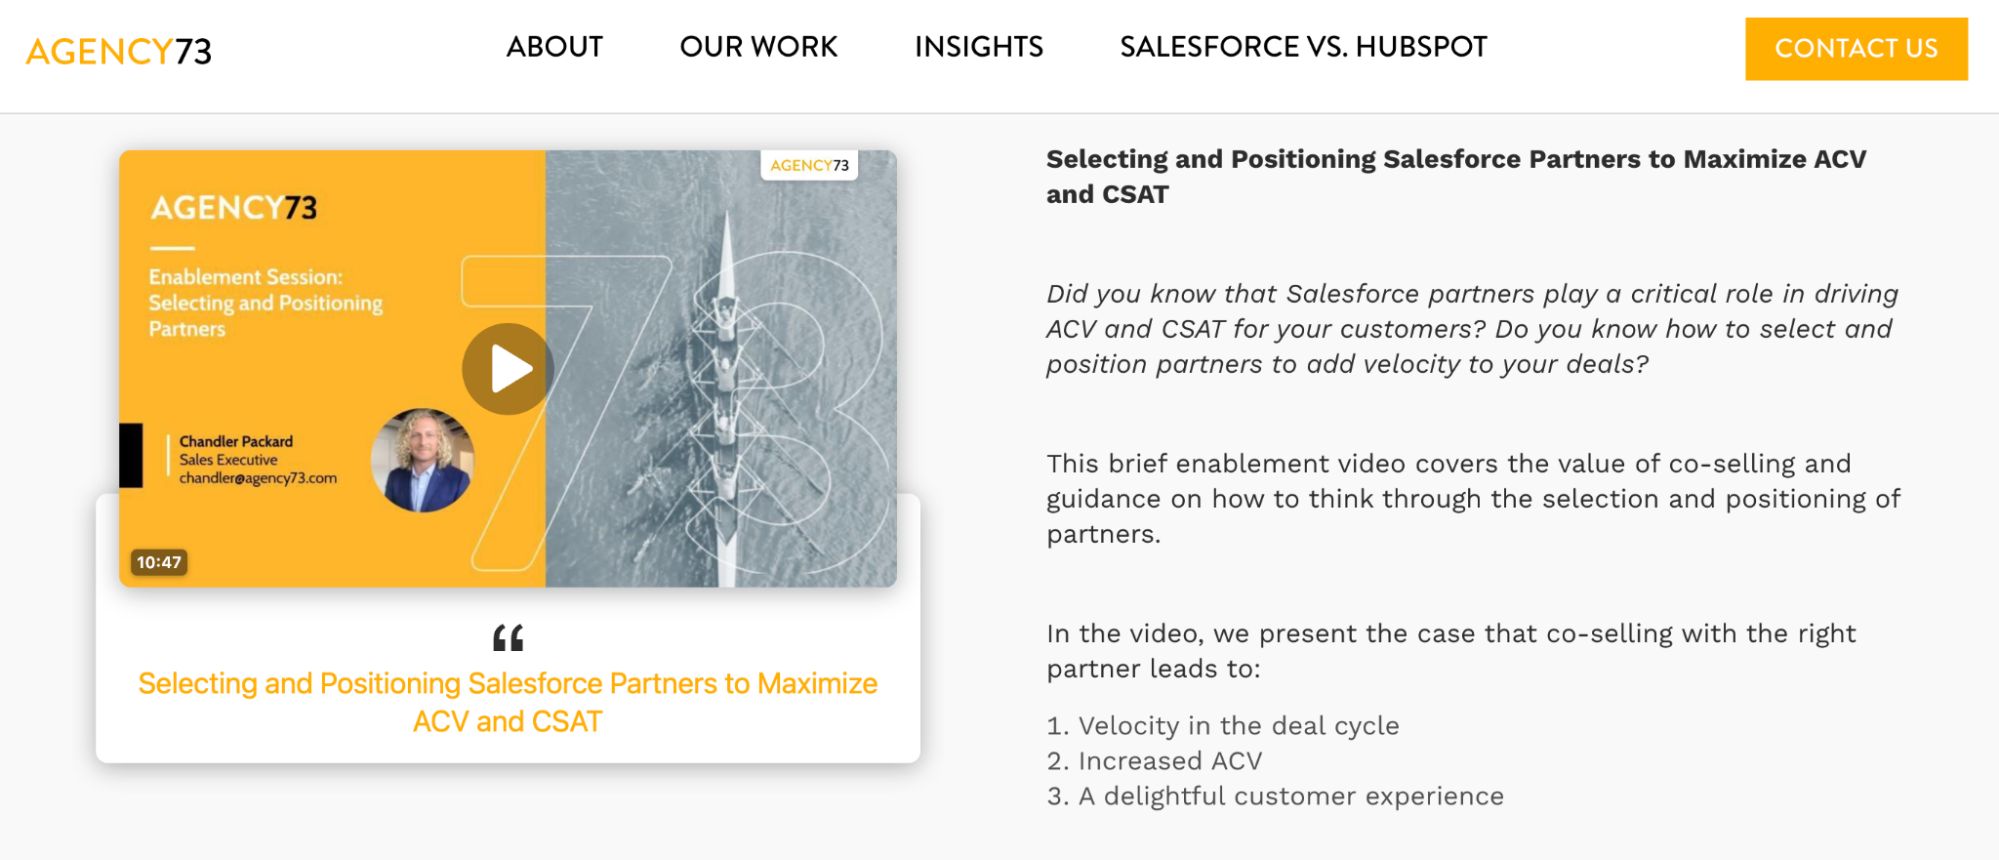
These videos (which you can watch in full here) have a professional opening slide created in a graphic design program. They show the speaker in front of a clean and inviting background, are well-lit, and perfectly balance the clarity of a scripted video with the warmth of speaking peer-to-peer. They’re also easy to follow because the content is split up into topics separated by text slides.
By positioning the tutorial alongside a written summary of the content, Agency 73 set the scene and points the potential viewer to the information that’s most relevant to them. This leaves more space in the video to describe the origins of the company and build trust with the viewer by explaining their experience in the industry.
Finally, they use the video tutorial as a tool to move potential clients further down their marketing funnel. Once the viewer has an idea of what they have to offer, they’re pointed toward the live sessions, where they could learn even more. This is the kind of content that could perform well on a site like LinkedIn or on a YouTube channel to funnel their social media followers toward the live offering, too.
3. LenderLink: Educational Insights on the Latest Trends and Challenges
LenderLink connects borrowers and lenders for various loan types. They use Vocal Video to inform potential property investors about the market.
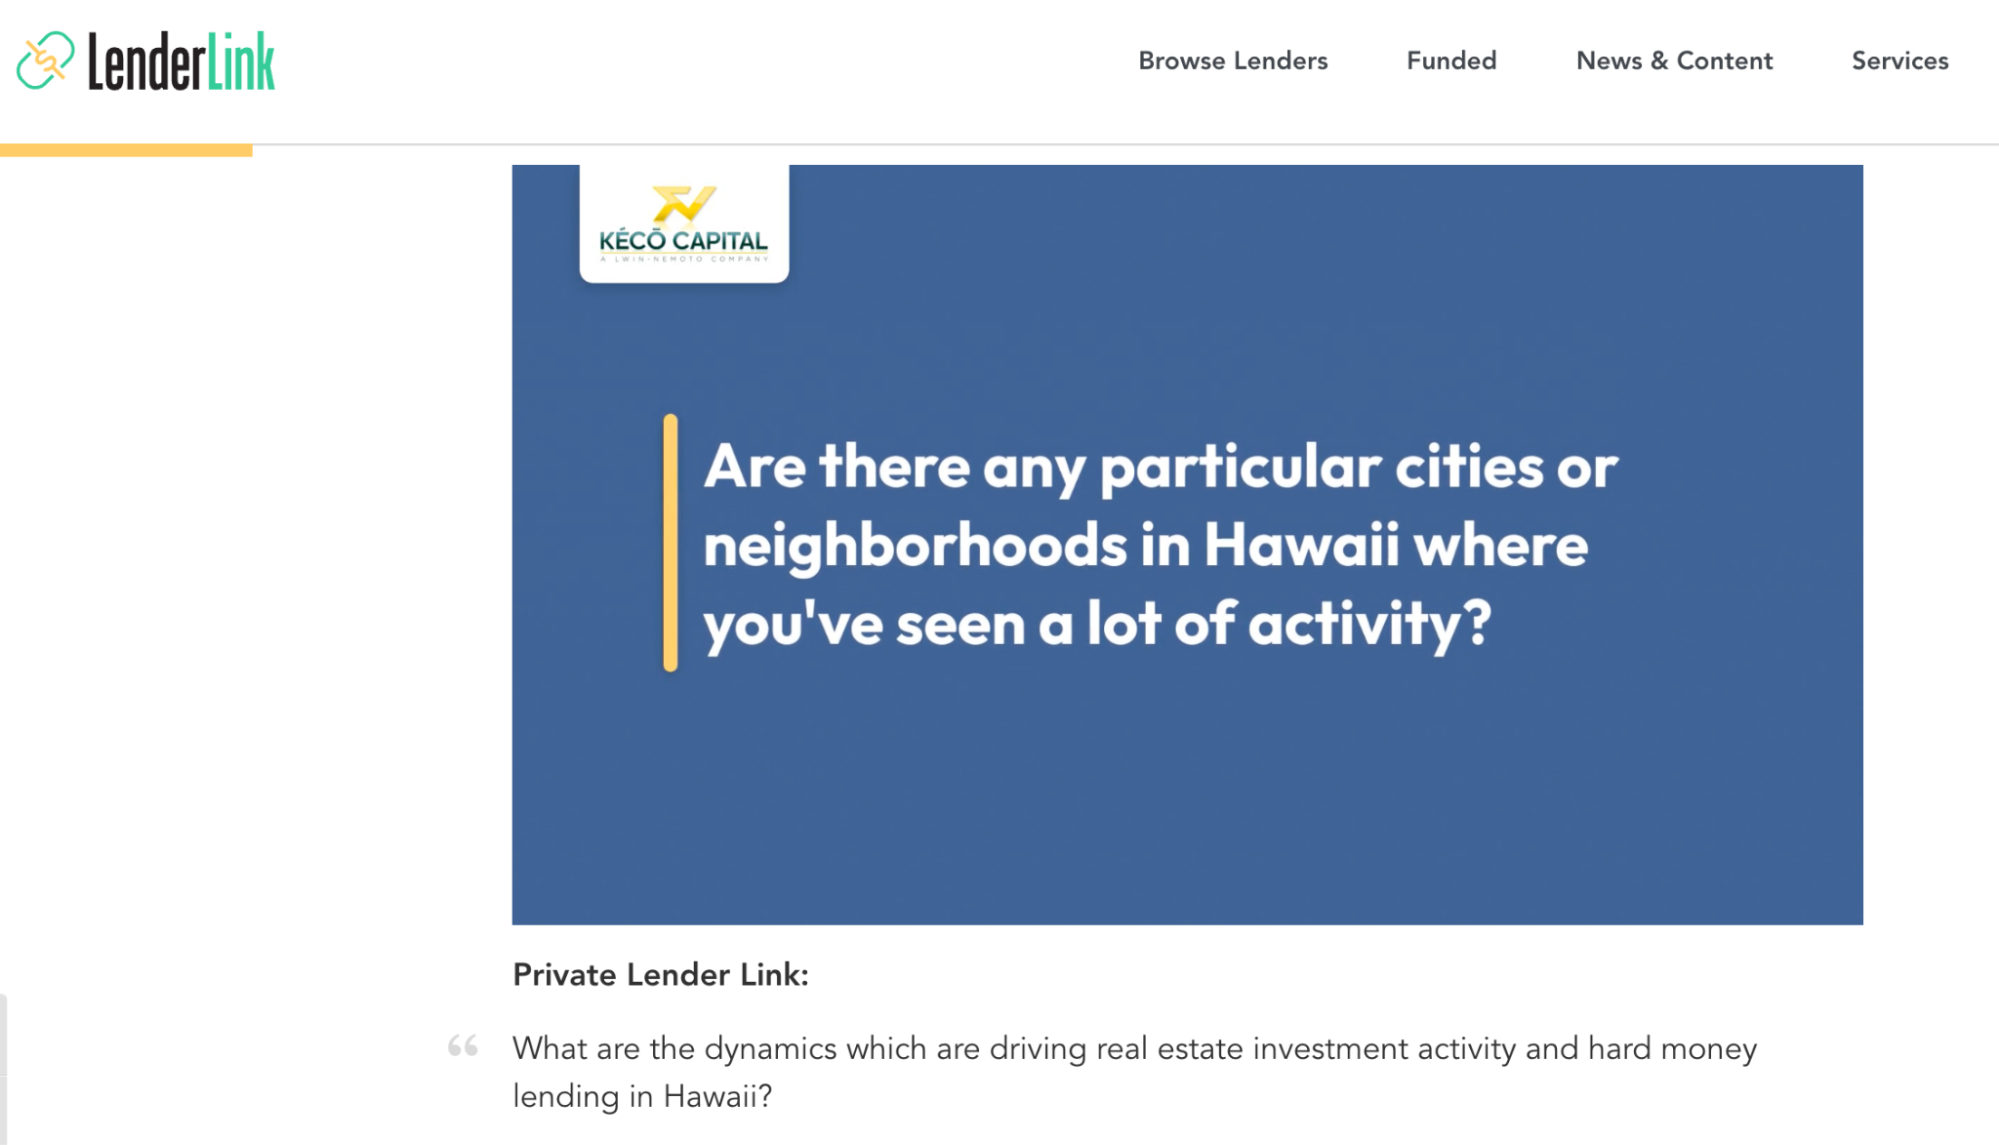
This video is all about sharing expertise to build trust. The speaker is experienced in the industry and was born and raised in the area he’s discussing. This helps potential investors feel comfortable reaching out to the company for more information.
As well as the video, LenderLink has published the full transcript of the interview. This makes it easy for people to skim the content (for example, if they’re comparing opportunities in multiple regions) and also makes it easier for new potential clients to find the content in the first place, thanks to the keywords that come up in the interview.
Again, because this content lends itself well to a series (for example, addressing the market in different states), it would be completely at home in an online video tutorial gallery or a sequence of spotlight posts on social media.
You can see the video and transcript here.
More Great Reasons to Create Professional Video Tutorials with Vocal Video
From your first idea to your final edit, the video tutorial process can be smooth and intuitive. We’ve already shown how tutorials can support your customers and help with staff training, and there can be fantastic benefits for your marketing strategy, too.
Video tutorials can…
- Boost your SEO efforts because people experiencing the pain points your company can solve will naturally search for how-to videos and solutions online. Your content can create a lasting, positive impression, especially if you’ve used Vocal Video’s branding features to make it memorable.
- Increase brand awareness and authority by positioning your company as experts in your industry. Plus, demonstrating exactly how you can improve a process or solve a common issue puts your company’s offering in real and relatable terms.
- Build trust with potential customers because, in contrast to written instructions, video tutorials put a face to the information. The conversational format puts the viewer at ease, and your tone and interjections reassure them that they’re not alone in the challenge they’re facing.
And with Vocal Video’s simple recording process and effortless editing, you can get started today.
Vocal Video makes it quick, easy, and affordable to create video content, whatever your level of experience. Sign up for your free account now.